Getting started
This Getting Started guide will show you the necessary steps needed to set up an event in Preseria and how to invite presenters to upload their presentation files for their scheduled presentations.
- Creating your first event
- Enter event details
- Add sessions
- Add presentations
- Add breaks
- Customize an email template
- Send email invitations
Creating your first event
After successfully logging in, you will be taken to your dashboard showing an overview of upcoming and recent conferences created by you or created by other members of your organization. For a fresh database and brand new Preseria site the dashboard will be empty.
To create your first conference, click on New Conference or New Day Conference.
Should I choose Conference or Day Conference?
Choose "Conference" if your event lasts for more than one day and/or contains multiple sessions in different rooms. "Day Conferences" are suitable if you plan a single day, single room event, like a seminar or a smaller meeting. A "Day Conference" can also be suitable to create a sub event to a larger conference, for instance if you want isolate access levels to certain admins to the sub event only.
For the rest of this Getting Started tutorial we will assume you want to create a Conference with multiple sessions and spanning multiple days. You can skip to the Add Presentations section if you selected Day Conference.
Enter Conference details
Click the New Conference button and enter the following conference details:
- Title: The title of your conference (or congress, seminar, meeting, etc.).
- Location: The city or conference venue (name of hotel, convention centre or building).
- Time zone: The timezone where your conference takes place geographically.
- Start Date: The starting date of your conference (the first day of presentations).
- End Date: The end date of your conference (the last day of presentations).
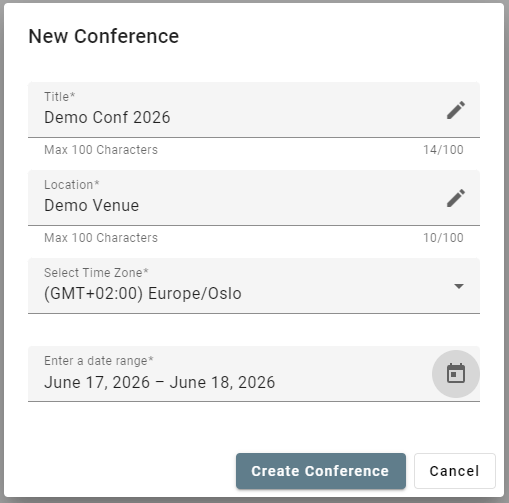
New Conference dialog
Add Sessions
Once you've entered the conference details, you'll' be redirected to the conference's session overview. A newly created conference starts out as empty. The next step is to add sessions and presentations according to your event's schedule.
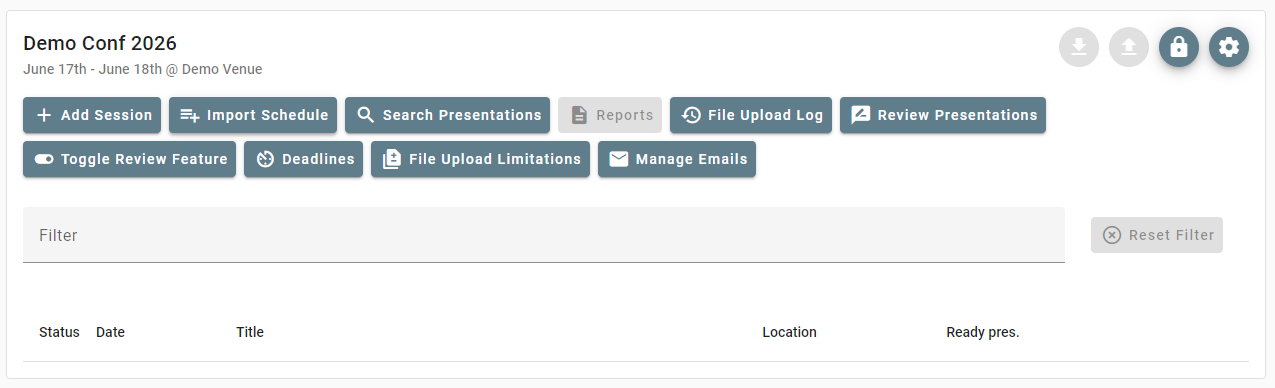
Session Overview - A newly created, empty conference
Terminology: What's a "Session" ?
A Session in Preseria is a chronologically ordered collection of presentations. A Session has a start time and an end time (within the same day) and is limited to a specific location (typically a room).
You now have two choices:
- Manually create your sessions using the Add Session button.
- Import the sessions and the presentation schedule from an Excel spreadsheet using the Import Schedule button.
If you want to build the schedule using an Excel spreadsheet (choice #2), skip the next part and jump directly to Excel Import.
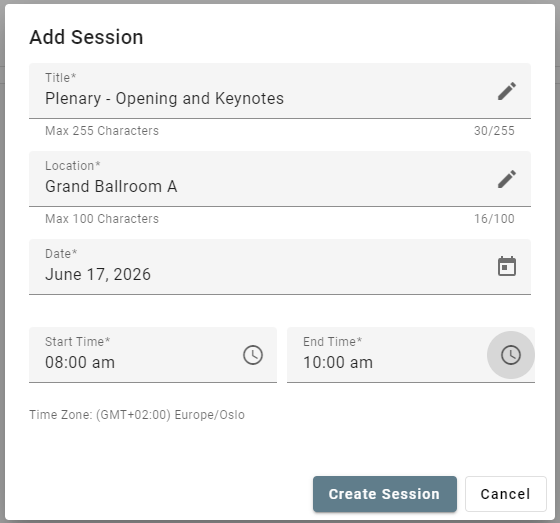
Add Session dialog
Hint: Use "Import Schedule" to mass create sessions and presentations
Re-creating a large conference programme, one session at a time, will require a lot of mouse clicks and can quickly become tedious. A faster way to set up the sessions and presentation slots is to add all the details to an Excel spreadsheet and import it. See Excel Import for detailed information.
Add Presentations
As mentioned in Add Sessions, you can also add a session's presentations via Excel Import.

Session Overview - One session added
Now that you've created one or more Sessions, open one by clicking on its row in the overview of the Conference.
Sessions will initially be empty. Either click the Add Presentation button to add a single presentation (and it's presenter), or click the Add Presentations button to add multiple presentations to this session.
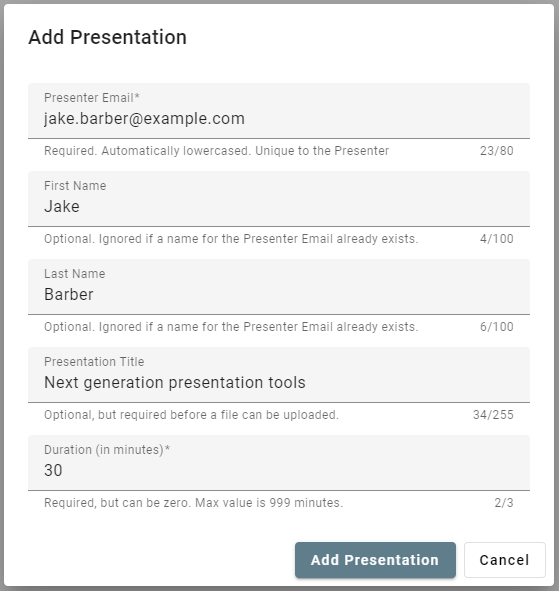
Add Presentation dialog
Clicking Add Presentations will open up a page where you are presented with two steps:
- Input Data
- Confirm New Presentations
The first step, Input Data, has two tabs; ONE BY ONE and BULK ADD. They offer two different way of manually adding presentations to the session:
Input Data - ONE BY ONE
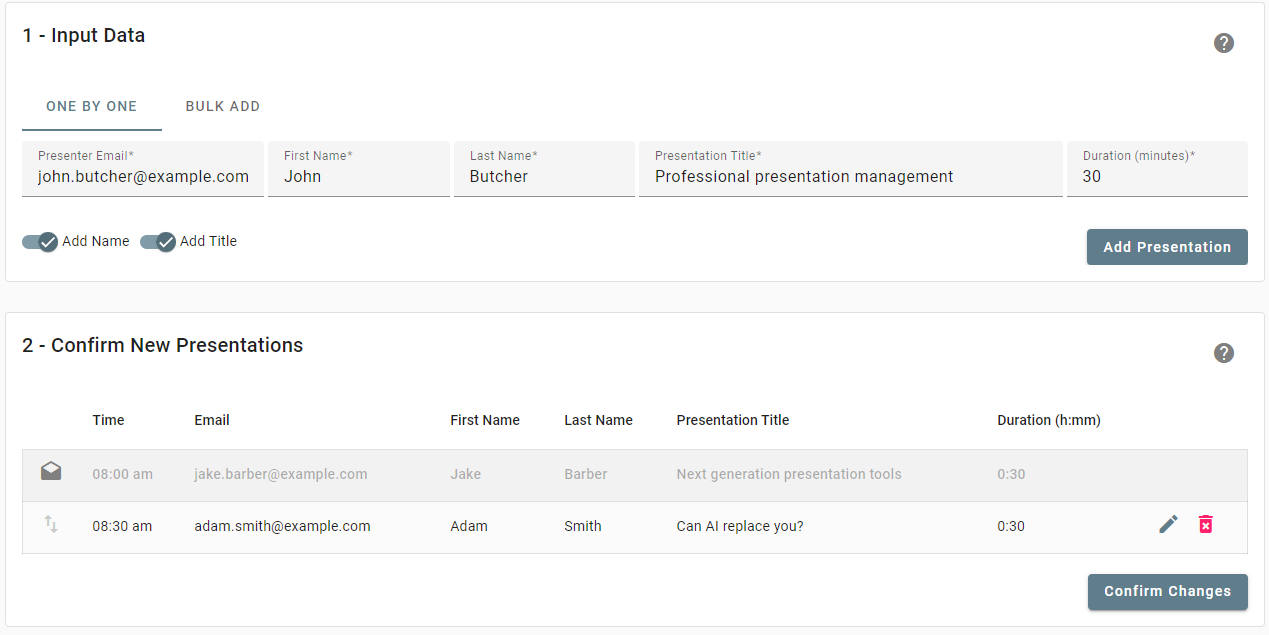
Add Presentations one by one
You can add one presentation at a time by entering the presenter's email and the presentation's duration in minutes. You may also enter the name of the presenter and the title of the presentation. If you don't enter a name or presentation title, the presenter will be asked to provide these details when they log in.
Hint: Use keyboard shortcuts for faster data entry
The TAB key will jump to the next input field and the ENTER key will submit the row (add a Presenter).
Input Data - BULK ADD
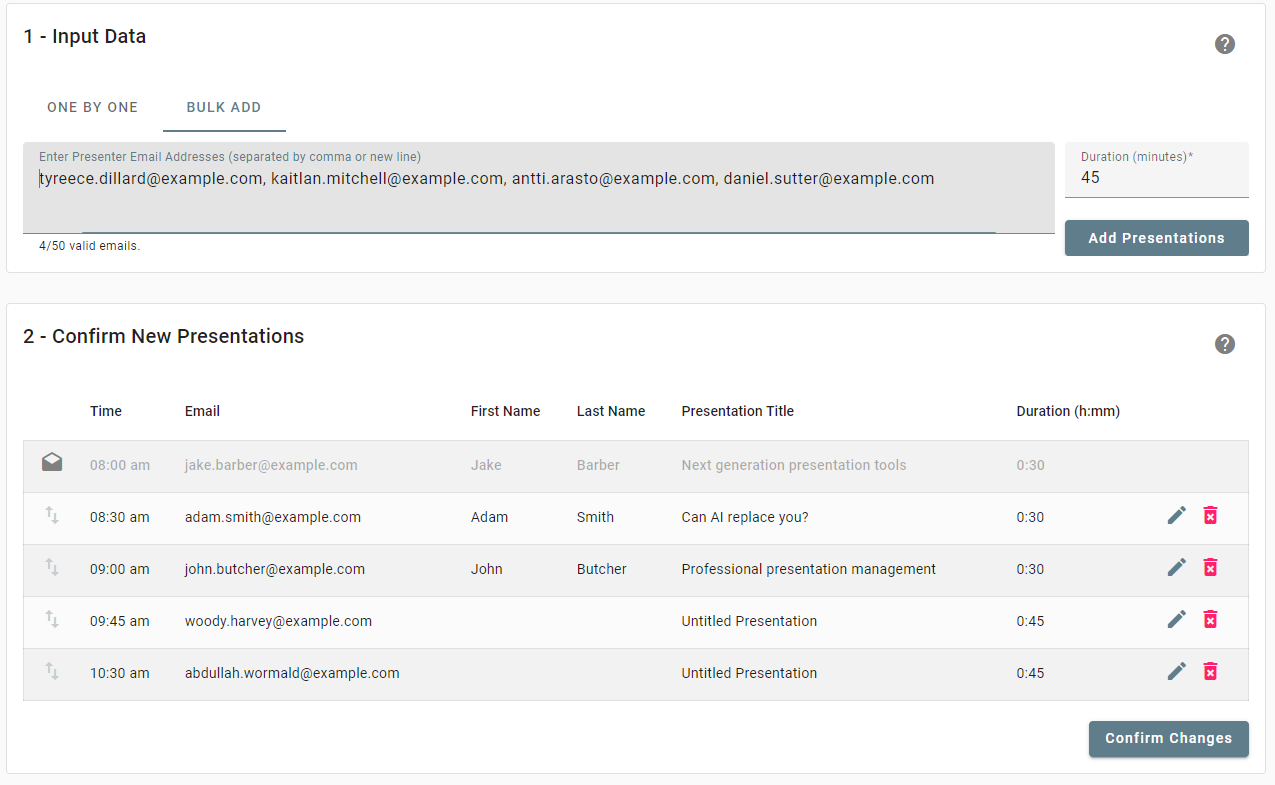
Bulk Add Presentations
To add multiple presenters in one go you must enter their email addresses separated by a comma or new line. All presenters added in bulk will have the default duration and their names and presentation titles will be empty. You can edit these details in the "Confirm New Presentations" step.
Confirm New Presentations
After entering the presentation and presenter details in the first step, you can do some modifications before confirming to add these presentation slots to the session. You may edit each row separately by clicking the pencil icon and you may re-order the rows by clicking and dragging the arrow icon on each row. Once you are happy, click Confirm Changes. Don't worry if the times do not 100% correspond to your conference programme. You can insert breaks, modify the duration of each presentation and re-order presenters at any time.
Info
Adding presentations to a session does not trigger any email invitations to be sent from the system. Sending email invitation is a manual action that you perform under "Manage Emails".
After adding presentations to a Session, you will see that each presentation is represented as a row and that the presentations are ordered chronologically from top to bottom. You can now add breaks (as described in Add Breaks) and re-order presentations to correspond with your event schedule. Repeat the previous steps for each Session in your conference, and insert breaks where appropriate, before continuing to Customize email template.
Add Breaks
"Breaks" inside a Session are simple time separators you can add to indicate that there's a pause between presenters, and to properly align the times in Preseria with the times in your conference programme.
Click the Add Break button and enter the break duration in minutes. A "Break" row will be added to the bottom of your Session. Click, drag and release the Break into its correct position, then click "Save" to confirm the changes. The start and end times will automatically be re-calculated.
Excel Import
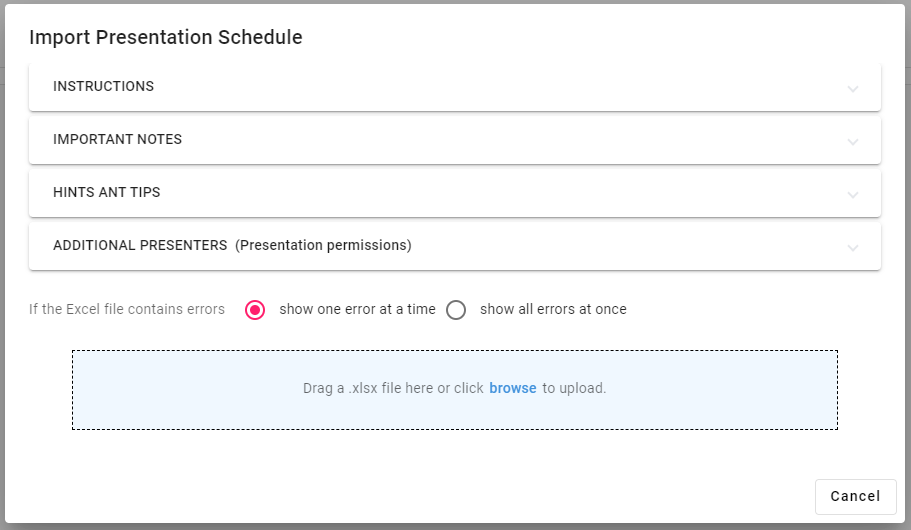
Import your event schedule using an Excel sheet
You can mass create Sessions and Presentations in Preseria by importing a correctly formatted Excel file containing the Session, Presentation and Presenter details.
You may also append new presentations to sessions after an initial import, but updating existing presentations (changing the order, title or move presentations between sessions) has to be done from within the web application.
Download Excel Import Template
A detailed tutorial on how to use the Excel template can be found here
Customize Email Template
For presenters to be able to upload files to their assigned presentations you will have to send them an invitation email. The system will generate a unique link per presenter email that you added and you choose yourself if you want the system to send out invitations all at once, individually or in batches. To customize the email template sent to presenters, the first thing you want to do is to add an Email Banner Image
Upload an Email Banner Image
The default Email Banner is the Preseria logo on a grey background. Unless you upload a custom Email Banner, this is what presenters will see at the top of their invitation email:

To override this default, you must create a .png or .jpg image that is exactly 1200px wide and somewhere between 200px and 600px high. Feel free to use the default as a starting point. You can download it here:
Once you have your banner ready, you should navigate to your Conference (where you now see a list of all the conference sessions you've previously created). In the top right, you'll see a gear icon () which will lead you to the Settings page for your Conference.
Under Settings there will be a section for Email Banner. Click Browse to bring up the dialog that lets you upload your custom email banner.
After you've successfully uploaded a custom email banner for your Conference, it will be used as the new default for all your conference's Sessions. If you want to add a custom banner to one or more sessions, overriding the conference banner, you can do that by opening the session and following the same procedure.
The next step is to customize the email subject, sender name and content.
Edit email invitation
Go back to the conference overview (showing the list of sessions for your event) and click the Manage Emails button to bring up the Email editor.
You'll see four tabs:
- COMPOSE EMAIL: This is where you load your email template, make adjustments and send test emails.
- SEND EMAIL: This is where you select the recipients (presenters) who will receive the email invitation and apply your filters.
- AUTOMATE EMAIL: This is where you can automate sending email to presenters at specific dates and times.
- EMAIL HISTORY: This is where you can see a log of all emails that's been sent for this event and to whom the emails were sent.

The COMPOSE EMAIL tab of "Manage Emails"
Your account will always have at least two templates: The "Default Invitation" and "Default Reminder" templates. You will probably have to adjust a couple of things after loading one of the default templates, such as the "Sender Name", and "Email Subject" to fit your conference.
If you make modifications, and want to save your changes, you can both save it as a new email template (for use in other events or by other organizers in your organization) or just save it as the standard template for your current conference.
Email template fields
- Sender Name: The "From" field of the email, typically your name, the name of your organization or just "Eventname organizers".
- Reply-to Email : Replies will be sent to this email address when recipients click "Reply" in their email clients.
- Email Subject : The subject (title) of the email. May contain email macros.
- Email Body : The actual email content, based on your selected Email Template. May contain email macros. A login button will always be inserted at the top of the email, between the email banner and the email content. Clicking that button will take the presenter to a sign up page where they will choose a password, or directly to the login page if they've already selected a password.
Email templates (Subject and Body) may contain email macros, which will automatically be replaced with the correct text fetched from the schedule database. These email macros are available:
- [conference-title]: The Conference Title
- [conference-location]: Conference Location
- [conference-start-date]: Conference Start Date
- [conference-end-date]: Conference Start Date
- [presenter-firstname]: Presenter First Name
- [presenter-lastname]: Presenter Last Name
- [session-title]: Session Title
- [session-location]: Session Title
- [session-date]: Session Date
- [session-start-time]: Session Start Time
- [session-end-time]: Session End Time
- [session-custom-id]: Session Custom ID
- [session-deadline]: Session Deadline
- [presentation-title]: Presentation Title
- [presentation-start-time]: Presentation Start Time
- [presentation-end-time]: Presentation End Time
- [presentation-duration]: Presentation Duration
- [presentation-custom-id]: Presentation Custom ID
- [presentation-custom-value-1]: Presentation Custom Value
- [presentation-custom-value-2]: Presentation Custom Value 2
- [presentation-deadline]: Presentation Posted Deadline
Send a Test Email
To see how the email template actually will look like for the recipients, with "Register / Login" button and email banner added, enter an email that you can access in the "Send a test email" field and click on "Send Test". Check your email and verify that it looks right. Now is a good time to check your email template for spelling errors.
Send Email Invitations
You may send the email invitations to the presenters in a conference all at once, to individually selected presenter or presenters filtered by session, dates, rooms, etc. If you intend to send a session specific or otherwise special email template that's different from the default one, remember to select that one in the COMPOSE EMAIL tab before sending.
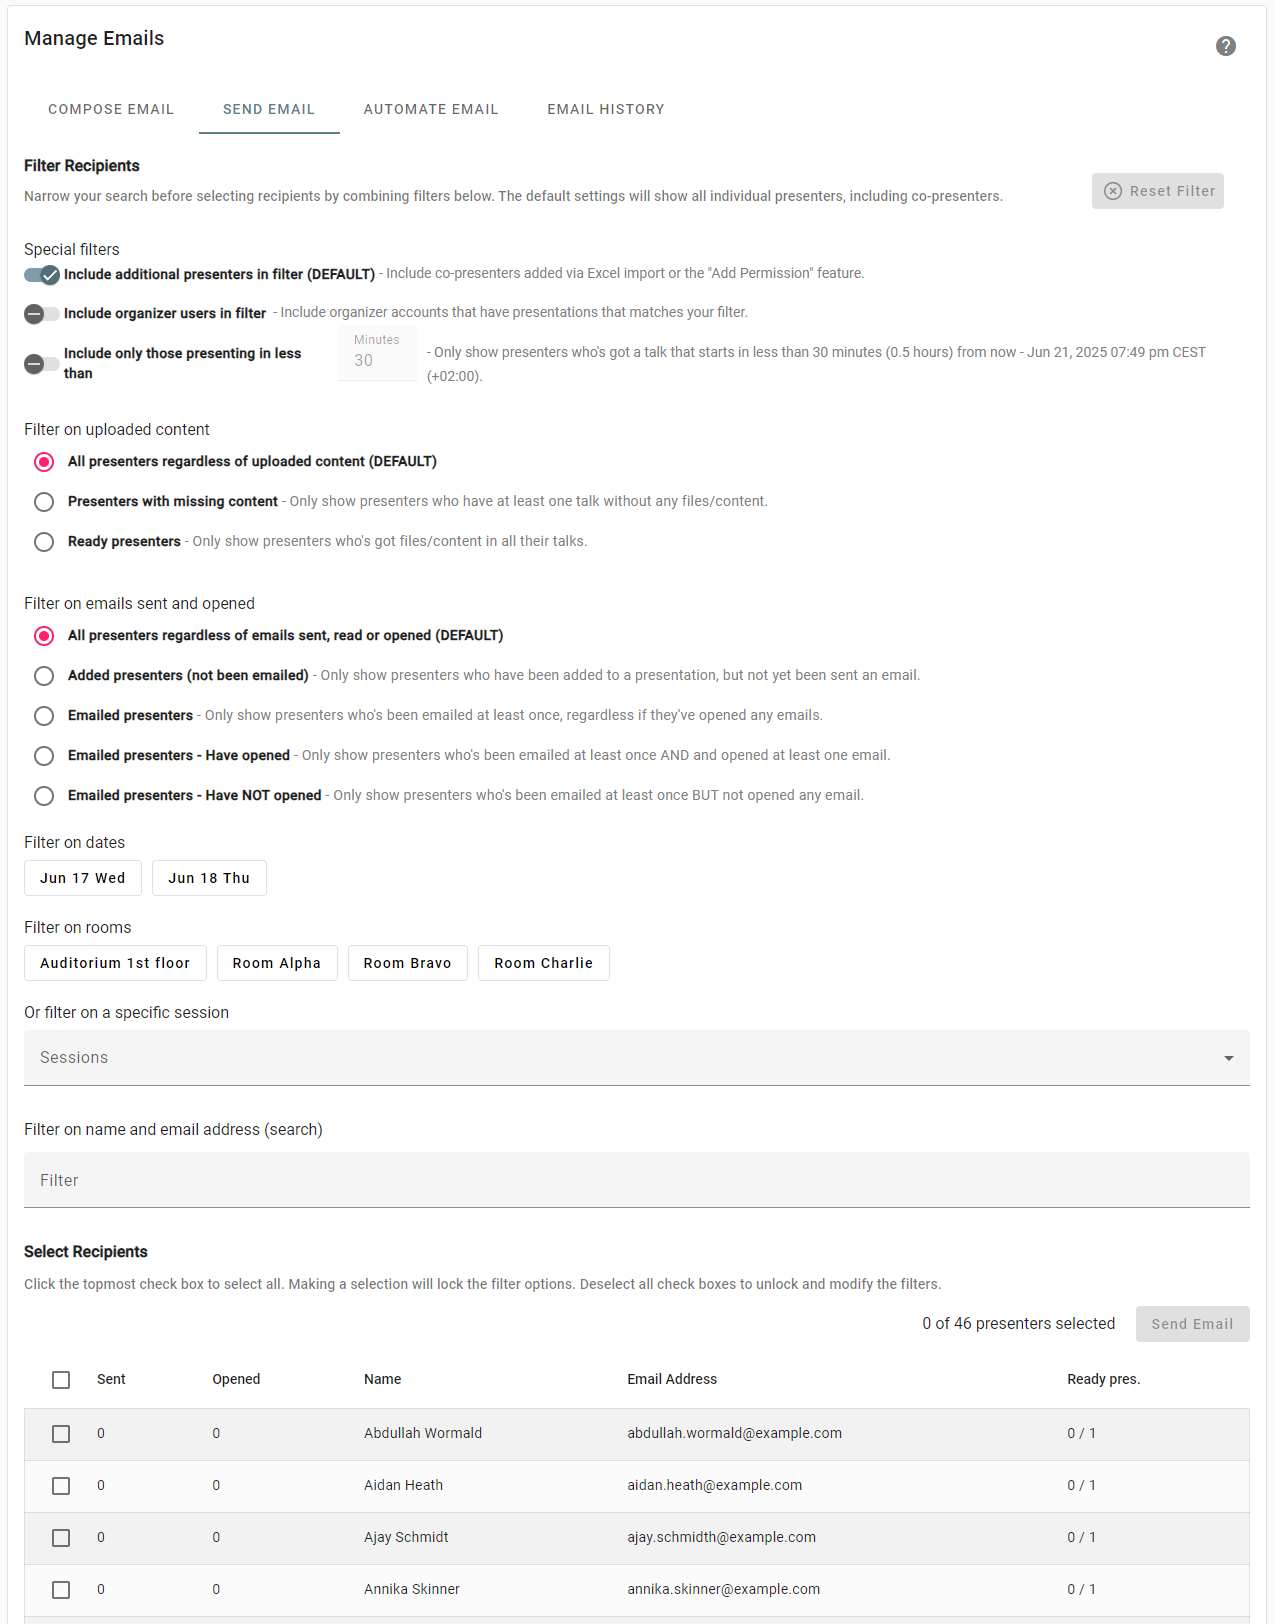
The SEND EMAIL tab of "Manage Emails"
Newly added presenters will show up as having zero "Sent" and zero "Opened" emails. They will have zero presentations that are "Ready" (at least one file uploaded) and your next step is to invite these presenters by making Preseria send them an email invite based on your selected email template.
Check the box of the individual presenters you want to invite in this batch, or click the checkbox in the table header to select all.
You may filter out presenters that you've previously invited (if you chose not to send all invitations at once) or only send to those that haven't uploaded files yet (missing content).
From the SEND EMAIL tab you can also see who has opened your emails ("Opened" column) and see the email history by clicking on the number in the "Sent" column.
When you are ready to send, click the Send Email button, confirm your choice to send to X recipients, lean back and wait for the speakers to upload their presentations. If you need to send a reminder, follow the same process, but optionally modify the email template a bit to emphasize the urgency (for example if an upload deadline is closing in).
Download & Install Desktop App
Once you've sent your first batch of email invitations, you should let the recipients get some time to check their email inboxes before sending any reminders. Meanwhile you wait for the presentations to be uploaded, you may want to install and familiarize yourself with the Preseria desktop app, that lets you download and synchronize uploaded presentations.